Friday, April 30, 2010

Wedding card

We have a few weddings to attend this summer, so I figured I better get a jump on making some cards.

I added a wedding card to the card workshop the other night for the ladies to create.  This one uses the That's Amore paper pack along with some colored paper flowers, buttons, and waxy flax.  (I just love to use waxy flax to thread my buttons, it works great!)
I love the looks of it!

Have you been playing with Studio J yet?  I have and I love how quick and easy it is for me to play catch-up with my scrapbooking.  I have a trip that I think I am going to Studio Scrapbook the whole thing.  I will show you the pages as I get them back...of course, I will be waiting until I have at least 10 pages done to order...gotta get those FREE memory protectors, you know!

Tomorrow is the start of the new Summer Idea Book and Catalog.  Stay tuned for more goodies headed your way...

Happy Scrappin'

Thursday, April 29, 2010

More Graduation cards

 Here are the other two Graduation cards my ladies got to make at the workshop.  They both are also pretty simple, but fun.
Do you have as many Graduations to go to this year as I do?  This will be a tough year for us, but we will get through it!
Happy Scrappin'

Wednesday, April 28, 2010

Graduation cards

Today I have some Graduation cards to show you.  These are some of the cards that my girls got to make at a card workshop I had last week.  With Graduation right around the corner, these were a hit!
The ladies got to choose their colors on these two cards.  They were pretty easy to make, but look great.  Sometimes simple is better.  I like the nice clean lines of simple sometimes.
Tomorrow I will show you the other Graduation cards they got to make.

Happy Scrappin'

Tuesday, April 27, 2010

Studio J Customer Release

Real Life.  Real Scrapbooks.  Real Time.  That is the tag line with Close To My Heart's new Studio J line.

I have talked about Studio J before and I have shown you some of the Studio Scrapbooking that I have done.  (If you are new here or just don't remember them, click on the Studio J label on the left to see them.) Now it is time for you to try it out for yourself.  Yes, you read that correctly.  Today is the day that it goes live to our customers!  Right now (well, maybe after you have finished reading my post) you can go to my website and check it out for yourself.  There will be a new link added there for Studio J.  Just click on that link and you can begin.

I will try to answer a few questions you may have.  If, after reading through this, you still have questions, feel free to leave a comment or send my an email and I will try to answer them for you.  Click on this link to watch the short demo video about Studio J if you have not already done so.
  1. What is Studio J Design Software? Studio J is free online scrapbooking design software brought to you by Close To My Heart. (Did I mention FREE?) Studio J helps you easily create custom-printed two-page layouts using our foundational scrapbook patterns, exclusive color palette, and themed designs all delivered in 12 × 12 custom prints ready for your albums. It’s a snap!
  2. Is Studio J easy to use? Studio J software is extremely intuitive and easy to use. The program walks you through five steps that include:


    1. uploading your photos
    2. choosing your desired themed kit
    3. selecting an exclusive layout pattern
    4. adding photos, embellishments, titles, and journaling
    5. purchasing custom-printed layouts ready for your personal album
    It’s super simple and extremely fun to use! 
  3. I love Close To My Heart products. Will Studio J use the same great papers, patterns, colors, and embellishments? Of course! If you love Close To My Heart’s scrapbooking philosophy, then you will love Studio J.
  4. Do I need to download any software to my computer to use Studio J? Nope! You only need an Internet connection, and then you simply log in to my MyCTMH website and click on the Studio J link to get started. Feel free to design to your heart’s content—you are not required to buy anything to get started!
  5. Can I save what I am working on and come back to it later? Absolutely! You can create a customer profile that allows you to save and return to a project in progress at a later time. Your active projects will be saved for up to 90 days, giving you plenty of time to work on them. You extend that timeline for your active projects by 90 days each time you make a purchase, and your purchased projects will remain archived for one full year after purchase.  Better yet, Close To My Heart will even send you an email to let you know where you are at with your project timeline.
  6. Do I need a printer that can print 12" × 12" pages to use Studio J? Nope. Your Studio J layouts are not available for you to print from a home computer. In fact, we take care of the printing for you. When you purchase your designed layouts, we print and ship them quickly and directly to you using only top quality printing technology and archival-quality papers.Mine arrived only a few short days after I purchased them.
  7. What is the price? You are not charged a thing until you order your custom prints. The price per printed two-page layout is $12.95 (well below the industry standard). We also offer some fantastic rewards for larger orders. You can receive FREE Memory Protectors to protect your layouts in your albums, and FREE shipping/handling based on the number of layout prints you purchase in a single order as follows:


    • For 5–9 layout purchases: You’ll receive a pack of 5 Memory Protectors FREE!
    • For 10–20 layout purchases: You’ll receive FREE shipping/handling PLUS a FREE pack of 5 Memory Protectors for every 5 layouts in your single order.
  8. When can I begin creating with Studio J? RIGHT NOW, Tuesday, April 27th!
Here are a few more layouts that I created using Studio J and just a few of the fun things you can do with this software.  As always, click on the photos for a closer look.
You can add Stickease (just like the real thing) except that you are able to change the size of the Stickease or even journal right on top of them.
I love the fact that you can adjust your photos to fit your needs.  This layout, I had 2 pictures I really wanted to add, but the top of the carousel was red...it just didn't match the paper I chose.  No worries, I just changed those photos to black and white.  Easy!
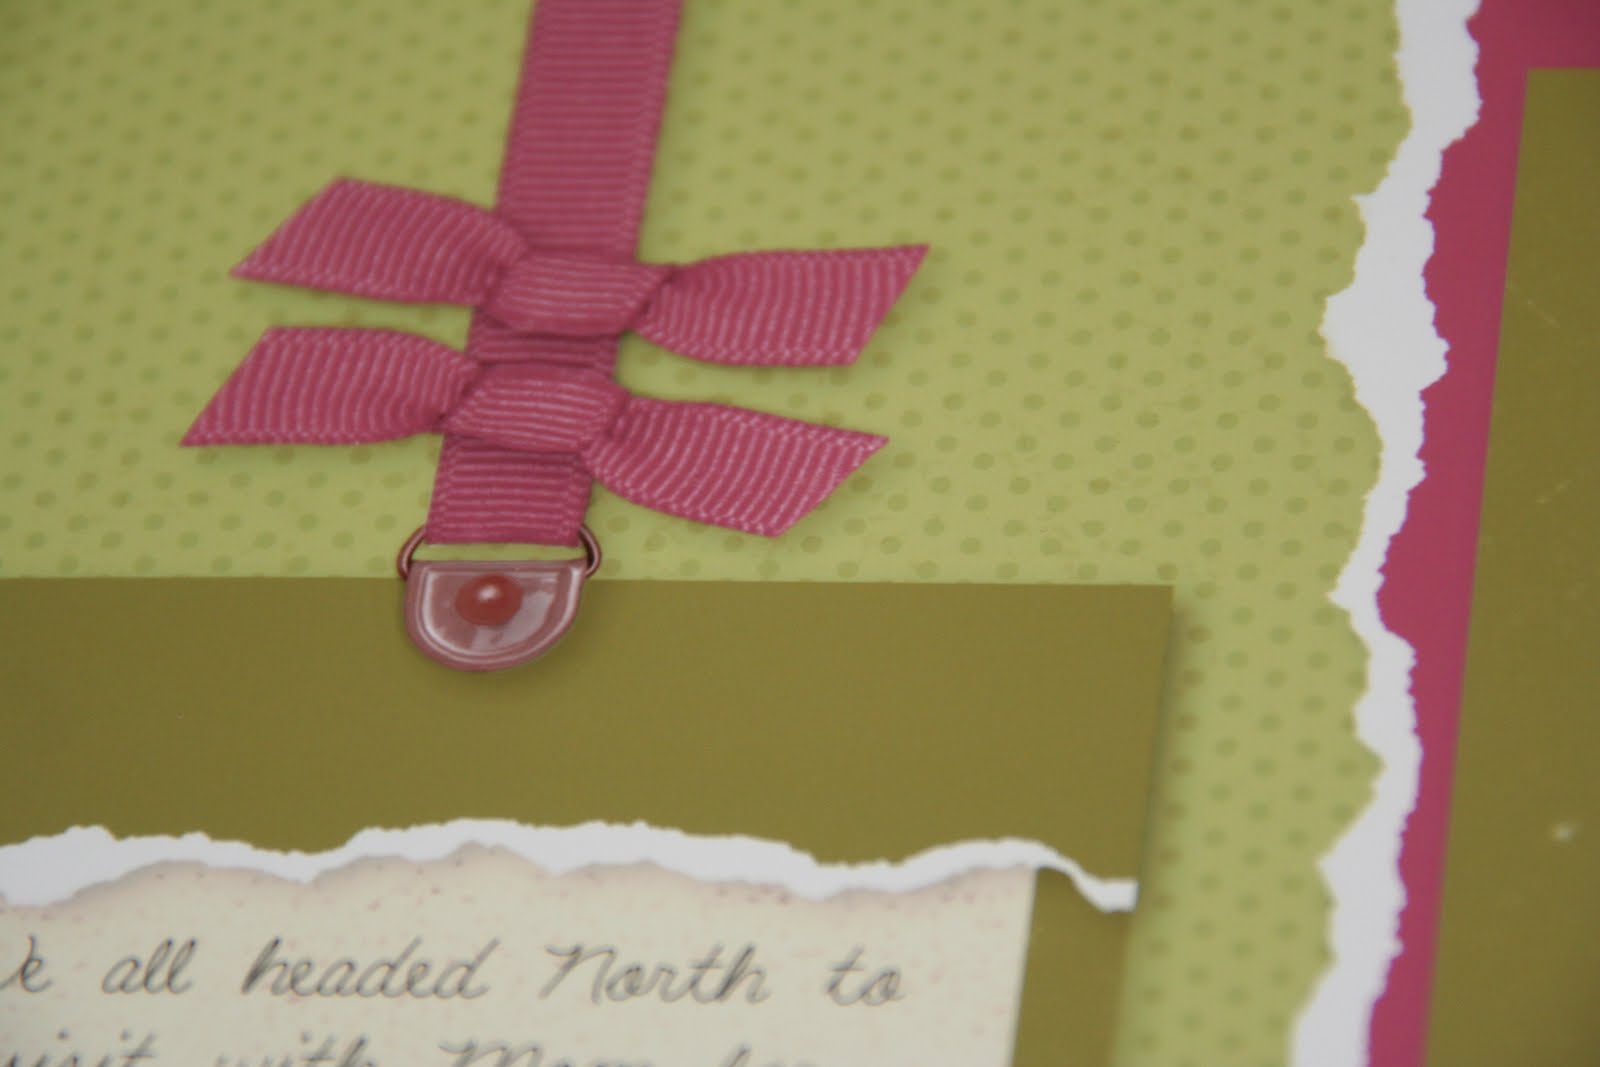
Also, just look at how real the ribbon and photo hanger looks.  Can you tell it's not real?  That paper tearing?  Also a feature of Studio J...it came out perfect and I didn't have to do the tearing.
I love to use buttons.  Here I have used them and look how real they appear.  They have added an automatic drop shadow feature to get the realistic look.  Another cool thing is that with the click of a button, you can change the color of the button and even the color of the thread in the button.  Love it!
Journaling is also easy to do.  You can choose the font, the color, and whether you wish it to be on cardstock (the color of your choice) or vellum.  They even have spell check  for us!
I will never stray away from traditional scrapbooking, but I will for sure be adding Studio J to my albums.  The fun part is that it goes so well with the traditional scrapbooking, you can mix and match your layouts.  You really need to touch and feel them to see which is which.  They are that real looking.  If you really like the lumpy, bumpy texture on your layouts, you can add that when you get them if you want.  What a fun new tool to be able to try out.  If you don't want to do Studio scrapbooking, you could just use it to plan out your layouts and embellishments before you purchase the products to see what you like the best.  Awesome!

OK, now go check it out and see how easy it really is...

Happy Scrappin'

Monday, April 26, 2010

American Pickers

Have you ever watched that show on the History Channel?  My husband and his brother have really gotten into watching it.  My husband even sort of considers himself a picker when it comes to tractors/parts...well, John Deeres anyway.  The show is all about these two guys, Mike and Frank, that work their way around the country's backyards, basements, garages, junkyards, etc. looking for extraordinary finds.  Then it's all about getting something for less than it is worth.

Ok, so fast forward to last Friday.  My husband and I took off for LeSueur, MN for a huge swap meet full of tractor parts.  People from all over the country come to this one as it is so large and has over 1000 vendors.  I went along for the ride just for the fun of it.  Dale ended up buying 2 things there (spent a ton of money on those 2 items) but did get a good deal on both of them.  He got what he went in search of and saved some money along the way.  What a great "picker" he was.

Then, on our way back through the town of LeSueur on our way home, they had dozens and dozens of garage sales.  Now, I am normally not a garage saler.  I love to shop at them if I am looking for something in particular, but otherwise, I just usually don't go to them.  I guess I must have been in the "picking" mood because I asked if we could stop at a couple of sales.  Sure, no problem-and with so many to choose from, we were in heaven.  I was really looking for 2 different items...a folding wood table of some sort for in our camper by the couch and some folding chairs for my craft room (the card table chairs are alright, but I was looking for something a little better).

The first place we stopped at had my folding wooden table for the camper.  It was in perfect shape and I even bargained on the price, getting it for almost half of what they were asking for it!  Then a couple of sales later, I was wandering around and Dale pointed out the chairs sitting there.  They were like chairs that go with your dining room table.  I sat in one and said they were nice, but I was looking for something more portable.  That's when the owner piped up and said that they fold.  Imagine my surprise.  She was asking $20 for all 4 chairs (a deal in itself) but since I was in that "picking" mood, I offered her $10.  We ended up settling on $12 for the 4 chairs.  What a bargain!  Don't they look good?  They are already in my craft room and waiting for my next class!
Are you a picker, too?  Normally I am not, but I had a fun little adventure with my husband that day.  We got home later that night and we were both exhausted.  All that fresh air and walking wore us out, we sure slept good that night.

Happy Scrappin'

Thursday, April 22, 2010

Invitations

Have you ever thought about having a Close To My Heart Party but then thought otherwise because of the 'work' involved?  Well, let me tell you, when you have a party with me, there is really no work involved!  All you have to do is have time on your calendar to do it.  I send out handmade invitations for you, your guests RSVP to you, I plan our project, guests show up at your place (or mine if you don't want to clean house or don't have room), we have our party (and who doesn't love to party), guests place orders, and the hostess receives the FREEBIES (hostess rewards are a great deal)!

Who could pass that up?  If you love Close To My Heart's products like I do (or even a fraction of how much I do) you really would want to have a party to earn the goods.  Talk about easy on the pocketbook.  My last hostess received over $100 in FREE product of her choice, the FREE Miracle Kit, and two 1/2 price items of her choice!  How awesome is that?

Here is a sample of the invitations I just sent out.  I have found that I get a better response to the handmade invitations rather than the postcards.  Who doesn't love to receive a handmade card?
Want to have a party of your own?  Just let me know and I can set you up!  Contact me at tammyhellstern@myctmh.com

Happy Scrappin'

Monday, April 19, 2010

Paper Wallets, First Communion, and Birthdays

That's a lot for one title!  That's because we had a lot going on yesterday.

My niece had her First Communion yesterday.  What a beautiful day.  She even baked her own unleavened bread for the occasion and decorated her own challis for the communion wine.  Congratulations, Kiana!
Her two sisters celebrated their birthdays yesterday, too.  Sam is a teenager now (well, she will be on the 28th anyway) and Kinzie just turned 11 last Tuesday.  These girls are growing up way too fast!  Happy Birthday, girls!
Here is their family...aren't they cute?
I decided that they were all just going to get money.  They all have things on their wishlists that are just too spendy for me...plus, they are girls and love to go shopping.  Well, since they were getting money, I HAD to make something cool to put it in.  How about these neat little wallets? 
 They were really easy to put together, too.  I ended up using retired patterned paper, but it worked out great because these are their favorite colors.  I even did a faux animal print on them.  Easy peasy to do-just put Versa Mark ink over the whole piece of cardstock and cover it with clear embossing powder.  Then run your bone folder through the embossing powder to make your pattern and heat it to melt the embossing powder.  You end up with an animal print-patent leather looking piece.
It's a good thing I put accordian folds on the sides as the girls kept adding all their money to the wallets as they opened cards.  They loved them so that made it all worth it!

Happy Scrappin'

Saturday, April 17, 2010

I've been inspired...

No, not in the creative department...in the cooking department.  Remember my scrapping retreat last weekend that I told you about?  We had some of the best food I have ever eaten...I think we even had dessert after breakfast!  Well, maybe that is an exaggeration, but the food was awesome.  I think the meal that stood out the most for me was the one that Mandi and Tracey prepared.  Mandi was in the kitchen making quite a racket pounding away on some chicken breasts.  She ended up making what I'll call her version of chicken Cordon Blue.  It was sooooo yummy, that I've been inspired to make some of my own!
I didn't have a recipe to follow, but I just did what I thought might work out and I even impressed myself!  All I did was pound the chicken breasts flat, put a slice of ham on top, added some swiss cheese (and a little bit of shredded mozzarella because I had some in the frig.) and then some asparagus spears.  Then I poured a little chicken broth over the top and sprinkled it with some sea salt and some Montreal Chicken Seasoning and then baked until they were done (I don't even remember how long...maybe 1/2 hour to 45 minutes).
They were sooo good-of course not as good as Mandi's (isn't it always better when someone else is cooking for you??)  Even my husband liked it.  The best part was that even on my diet, I could have it (the cheese was the only 'bad' part but I used fat free on mine!)

Let me know if you give it a try and how you made yours...I am always on the lookout for tasty but easy things to make.  Enjoy!

Happy Scrappin'

Friday, April 16, 2010

You're Sweet

Back to our regularly scheduled posting...
Here is the card I promised you.  I think it is my favorite of all my creations last weekend.  It is made using our new Cherry-O papers out of the new Summer Idea Book.  Just wait until you can get your hands on that little baby!  It is my favorite so far (of course, I think I say that with each new catalog).  If you, too, want to become a consultant with Close To My Heart, I would love to have you on my Hearts of the North team.  Just let me know and we'll talk.  Then you can also get your hands on the new idea book early and get some of the new items early to be able to 'play!'
 I love these little cherries stamped on the card (of course, then I covered them up with some tulip colored buttons).  I dry embossed some lines on the piece of cardstock underneath them and then added a little ink on the embossed lines.  I love that look!  I added a piece of tulip ribbon and lots of layers of cardstock (scissor distressed of course!)  I added tulip brads on the corners by the 'You're Sweet' message.  Maybe it's just me, but I loved the way this card turned out!  If you are in my demo board swap group, you will be receiving all of these new Cherry-O goodies I have been posting.

Happy Scrappin'

Thursday, April 15, 2010

A Miracle Awaits You!

I interrupt the post I said I was going to bring you today to show you a brand new special that is available beginning today...just look at this beautiful artwork created with the Miracle Kit!
Just look at the detail on these chipboard elements.  They are embossed so that when you sponge ink color of your choice on them, the embossing just pops out.  Isn't that great?  I think these pictures of my niece Kiana on her birthday look great with this paper pack!
Close To My Heart is offering this beautiful Miracle Kit to you starting today until May 31st (or while supplies last) in honor of National Scrapbooking Month (which is May in case you didn't already know).  This charming scrapbooking kit featuring spring-inspired colors and floral patterns is miraculously easy to assemble with no stamping required.  The brochure will guide you through easily creating two beautiful 2-page layouts.

See, even 'guy' pictures (like my father-in-law's birthday party) can look great!

There are several ways to snatch this fashionable kit at a great discount or even FREE!
*Purchase the kit outright for $19.95
*Place a minimum order of $40 and purchase the kit for only $10
*Place a minimum order of $60 and purchase the kit for only $5
*Sign up as a new Consultant between May 1-31 and receive a kit FREE!
*Host a Home Gathering between April 15-May 31 with minimum sales of $300 and receive a kit FREE!

I also created about a half a dozen cards using the scraps from this kit.  It is a very easy one to put together.
Shoot me an email if you are interested in this kit (tammyhellstern@myctmh.com).

Happy Scrappin'

Wednesday, April 14, 2010

Sneak Peak artwork from the new Summer Idea Book

Here is a card I made using the paper from the new Cherry-O collection in the new Summer Idea Book.  This book will go live to customers on May 1st.  Contact me if you would like a copy of it.
I think this paper pack just might be my favorite in the new book...of course, that always changes as I start creating with them all!  I stepped way outside of my box and created a round card using a pattern out of the Wishes How-to Book.  It really was so easy, I think I will have to make some more round cards!  It's hard to see in the photo, but the center circle is popped up.  I colored those cute little strawberries using our Exclusive Inks markers.  So easy!

Next I created a recipe card.  I used my recipe for Blu'Bana Bread.  Click on the picture to read the recipe more clearly.  Just wait until you see more of the products in the new book...you, too, will be creating recipes/cards/boxes!  That's all I will say for now...
I hope you have enjoyed, tomorrow I will show you my favorite card creation of the weekend.  Stay tuned...

Happy Scrappin'

Tuesday, April 13, 2010

What a weekend!

Holy cow!  What a weekend I had!  Friday started off with watching our little Tyler and his brother Avery.  Their Dad was at work and their Mom wanted to chaperone their older sister's field trip with school so we got to watch the boys.  It was such a nice day, we spent a lot of time outside playing.  In the couple of weeks since we had seen Tyler, he is now walking a lot...but when he falls down, he'll just crawl because that's easier.  He also is a big boy and has no more bottle.
Dale took the boys for a ride on the gator-Tyler thought he was driving-isn't he just so cute?
Of course, playing with John Deere tractors and equipment...is there anything else?
It must be a boy thing because Avery knew how to work the digger in the sandbox without being told.  Our sandbox is in desperate need of weeding as it hasn't been used in years, but Avery took care of one corner of it! Now he says he needs to come back to finish weeding it...too cute!
 When the boys left, I was headed out for a weekend of scrapbooking at a beautiful retreat house.  Go to the website here to check out Beaver Lake Landing.  Talk about being spoiled rotten there.  The place is gorgeous and you really never want to leave.  I got so much accomplished while I was there!  I will show you artwork little by little so you have time to re-create it as I go.

The first piece of artwork uses our Twitterpated papers.  I made about 50 of these babies to use for swapping when we go to Convention in Washington DC this summer.  It is a fun card to make.
Sunday when I got home, I had my club girls over and we had a lot of fun, too.  It truly was a weekend of fun, friends (old and new), and tons of creating!

Stay tuned in the next few days to see the rest of my artwork from the weekend.  There will even be sneak peaks from the brand new Summer Idea Book!

Happy Scrappin'