Today I have a layout that I made for my Demo Board Swap. It uses a brand new paper pack called Mayberry. This is a very versatile paper pack - not just for girls!
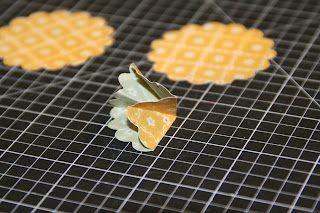
Did you check out the paper flower down in the lower right hand corner? (Remember, you can always click on the photos to enlarge them.) I will give you the directions how to make those little flowers. It really is very easy. I tried to show you in photos what I was talking about, but once you do one, they are a piece of cake - just my style :)
1. Punch out 5 scallop circles (CTMH has a brand new scallop punch that is oh-so-easy to use - our double sided B&T works great for these flowers, too!)
2. Fold the scallop in half.
3. Open it up, turn it 1/4 turn, and fold in half again (creating 4 sections).
4. Open it up, flip it over, fold it in half again (creating 6 sections).
5. Open it up, turn 1/4 turn, and fold in half again (creating 8 sections).
6. Open up and fold together making a flower petal.
7. Repeat steps 2-6 on 3 of the remaining scallops (if using double sided B&T, alternate sides of paper so you have 2 of each color).
8. Adhere flower petals to remaining scallop.
9. Add a brad or a button to the center of the flower. Done...it seems like lots of steps, but it really is simple!
Want to get your hands on this paper pack for yourself, just click here to start shopping.
Tomorrow I can show you the cards I made with this same paper pack...stay tuned!
Happy Scrappin'
December 2022 Winners and Final Goodbye
1 year ago


No comments:
Post a Comment